POSTS
使用hugo+github pages搭建静态网站
参考文档:hugo getting-started
下面将介绍非常简单的教程来搭建自己的博客网站,你既不需要买服务器,也不需要买域名,只需要个github账号,将静态网站托管到github上:
那我们就开始吧。
第一步:
安装hugo,这里以mac为例
- 以homebrew安装:
brew install hugo
- 查看版本:
hugo version
第二步:
创建一个静态站点:
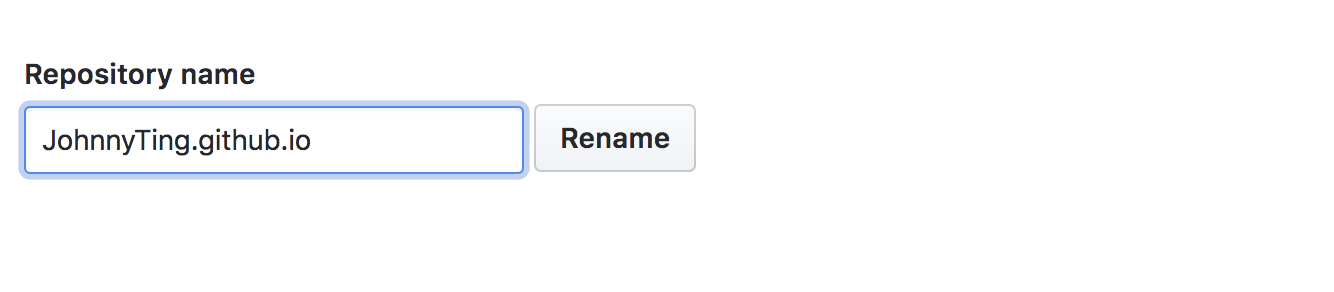
hugo new site JohnnyTing.github.io
第三步:
- 下载主题,首先进入站点根目录:
cd JohnnyTing.github.io
- 下载主题,这里以ananke为例:
   git init

   git submodule add https://github.com/budparr/gohugo-theme-ananke.git themes/ananke
- 添加主题到config.toml配置文件:
echo 'theme = "ananke"' >> config.toml
第四步:
添加内容(用markdown格式):
hugo new posts/my-first-post.md
生成的文件在content/posts/目录下,my-first-post.md文件去掉草稿,删除 draft:true 这行,因为创建内容默认是草稿模式,可以修改内容模板在archetypes/default.md中,设置draft: false。
---
title: "{{ replace .Name "-" " " | title }}"
date: {{ .Date }}
draft: false
tags: ["网站"]
categories: ["其他"]
mathjax: true
comments: true
share: true
---
第五步:
本地启动hugo服务,访问 http://localhost:1313/ 执行命令:
hugo server

#如果第四步对于草稿没有任何设置,下面命令网站也可以加载草稿内容
hugo server -D
第六步:
生成静态网页到public文件夹,执行命令:
hugo
第七步:
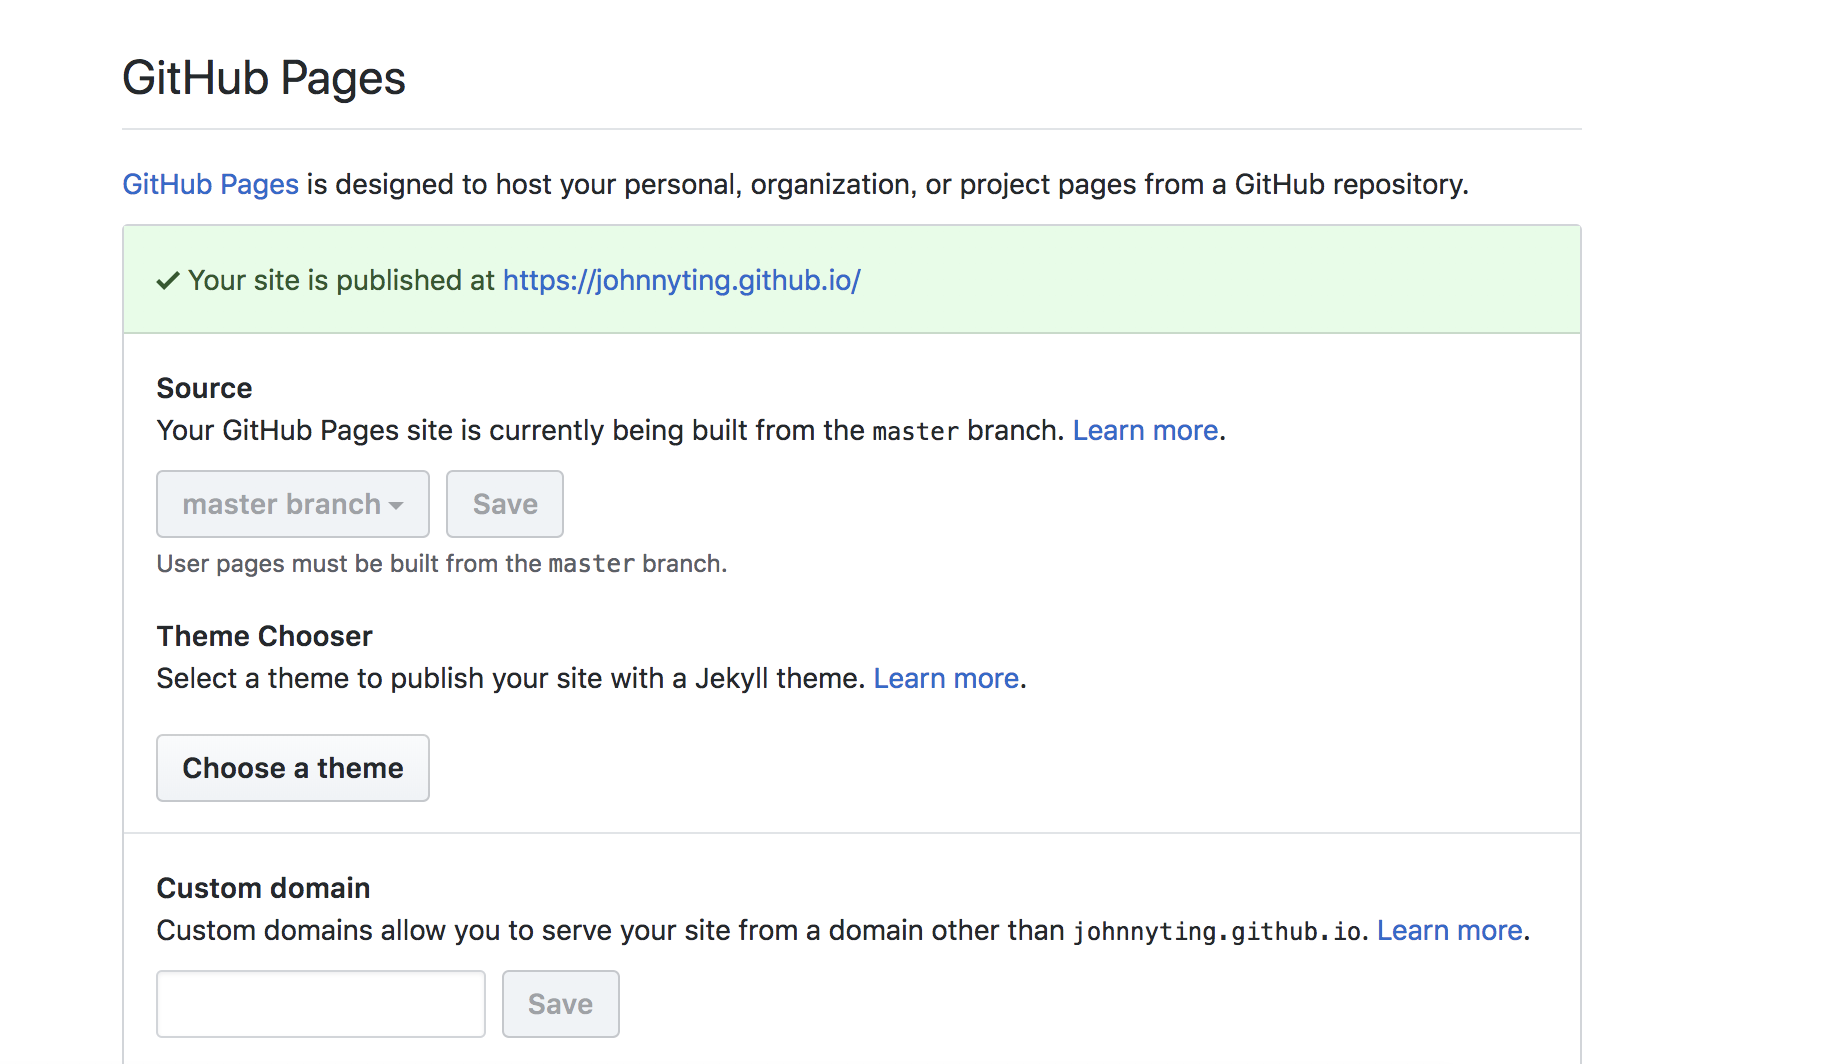
- 在GitHub创建自己的仓库,username.github.io,这里我创建JohnnyTing.github.io仓库为例,username为你github账号的名字。
- 然后将自己的public本地网页文件关联到github仓库:
   cd public

   git init

   git add .

   git commit -m "first commit”

   git remote add origin https://github.com/JohnnyTing/JohnnyTing.github.io.git

   git push -u origin master
- 然后访问自己的静态网站:https://johnnyting.github.io/
第八步:
- 这里每次创建markdown文件后,都需要一系列的git操作 ,这里可以创建一个脚本文件deploy.sh来简化操作。
   touch deploy.sh
   chmod +x deploy.sh
- 给deploy.sh文件添加内容:
   #!/bin/bash

   echo -e "\033[0;32mDeploying updates to GitHub...\033[0m"

   # Build the project.
   hugo # if using a theme, replace with `hugo -t <YOURTHEME>`

   # Go To Public folder
   cd public
   # Add changes to git.
   git add .

   # Commit changes.
   msg="rebuilding site `date`"
   if [ $# -eq 1 ]
     then msg="$1"
   fi
   git commit -m "$msg"

   # Push source and build repos.
   git push origin master

   # Come Back
新建文章:hugo new /posts/first-post.md
执行脚本文件,然后推送到github仓库: ./deploy.sh
第九步:
添加Discus评论系统
注册Discus(需要科学上网)> disqus官网
首页点击 GET START , 选择第二个 I want to install Disqus on my site
在Website Name中输入一个名称,点击创建
Continue 正常配置
配置页面有一个 Shortname Your website shortname is JohnnyTing.
将你的shotname配置到config.toml
DisqusShortname = “JohnnyTing”部署到GitHub上即可加载评论系统了
需要注意的是,访问你博客的人需要科学上网才能加载评论。
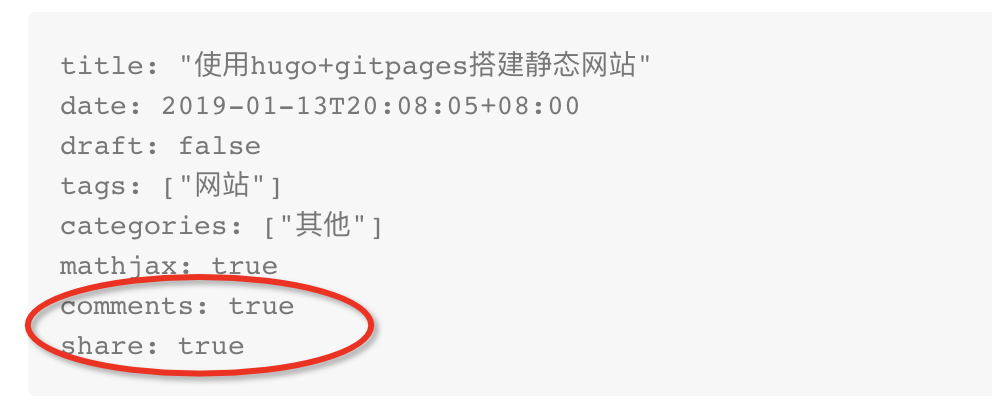
在markdown文件中添加评论和分享功能
   comments: true
   share: true
- 这里以我的config.toml示例:
   baseURL = "https://johnnyting.github.io/"
   # 语言编码(中文: zh-CN)
   languageCode = "zh-CN"
   # 默认的内容语言
   defaultContentLanguage = "zh-CN"
   # 自动检测是否包含中文/日文/韩文,该参数会影响摘要和字数统计功能,建议设置为true
   hasCJKLanguage =  true
   title = "Johnny Ting"
   theme = "ananke"
   canonifyurls = true
   # 分页
   paginate =  10
   paginatePath =   "page"
   # 启用 Emoji; see emoji-cheat-sheet.com
   enableEmoji =  true
   DisqusShortname = "JohnnyTing"
   [[menu.main]]
     name = "Home"
     weight = 10
     identifier = "home"
     url = “/"
   [[menu.main]]
       name = "Articles"
       pre = "<i class='fa fa-list fa-fw'></i>"
       weight = 20
       identifier = "articles"
       url = "/posts/"
   [[menu.main]]
     name = "Tags"
     weight = 30
     identifier = "tags"
     url = "/tags/"
   [[menu.main]]
     name = "Github"
     pre = "<h3>Follow me</h3>"
     url = "https://github.com/JohnnyTing"
     weight = 40
   [params]
     githubName = "JohnnyTing"
     cover = "/images/bg.jpg"
     author = "Johnny Ting"
     authorlocation = "Beijing, China"
     authorwebsite = "https://johnnyting.github.io"
     background_color_class = "bg-gray"
     featured_image = "/images/bg.jpg"
     favicon = "/images/bg.jpg"
     description = "程序员的日常。。"
   [permalinks]
     post = "/:year/:month/:title/"